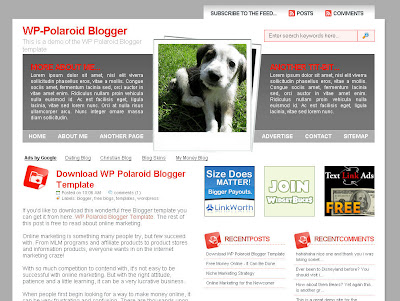
I’m very pleased to announce the release of WP-Polaroid for Blogger! This template is full of cool features and took me a long time to convert from the original WordPress theme (by Adii) so I hope you appreciate it. :-)
This template is very popular with WordPress users and for good reason. It’s stylish, nicely laid out, and very web 2.0. Not only that, it’s also got the following sidebar page elements built in. You just need to configure them (follow the directions below) in order for them to work properly.
* Flickr photo slideshow area where you can display your personal or random pictures
* Mybloglog recent blog readers section (you’ll need a mybloglog account)
* Three 125×125 ad spots to help you make money from your blog
* Recent posts list
* Recent comments list
* Two sidebar link lists
* Page navigation links in the header
* RSS feeds for your posts and comments
* A header spot to display your personal photo
Make sure to read through all the steps below in order for the template to function on your blog properly. I tried to make it as simple for you as possible by using the Page Elements instead of embedded code but if you have any questions, please post them below. I usually get back to everyone within 24 hours so please be patient!
Also, please be aware that in order to correctly setup this template you’ll need to be comfortable with editing the template code as well as some experience with photo editing software (see step #9). I’d hate for you to spend a bunch of time trying to get this template working only to hit a road block towards the end.
WP-Polaroid Blogger Installation
Now I’m going to be honest with you before we begin. When you use this template you’ll most likely have to wipe out all your existing page elements and start from scratch. Not only is this easiest but it also gives you a clean slate. Now this isn’t always the case but I just wanted to warn you upfront. You might even want to setup a new blog within Blogger to test this template out before you really start using it. It’s easy to do — just go to your Blogger dashboard (top right corner link) and “create new blog”. Think of it as a testing area before clobbering your existing blog. Another option is to try and backup your existing page elements which is explained in my “How to Install a Blogger XML Template” article.
Disclaimer: I am not responsible if you mess up your Blogger site. This template and set of instructions is free but does not come with any sort of warranty. I’m sure you already realize this but I just wanted to cover my butt regardless. (this is the fine print)
The following 10 steps assume you’ve installed the new WP-Polaroid Blogger template and are now ready to configure the page elements. If you had trouble installing the template, try applying it a second time and saving. Blogger is buggy and that’s actually what I had to do when setting up a demo blog for this writeup (Update - you might want to start with step #10 and then come back to step #1 since it involves editing the actual template code before setting up the page elements).
You can also download the original Photoshop .psd from Adii’s site if you’d like to modify the images. He also provides some steps on setting up the template but for WordPress only.
Open your blog site in a new browser window so you can see how it currently looks. I’ve put some placeholder text in some areas (which we’ll replace in the steps below) to give you an idea as to how it’s supposed to look. Now in a separate browser window, head on over to “Template” =>”Page Elements” and we’ll start setting up your new Blogger template.
Step #1 - Configure the Header Page Elements
First we’re going to customize the header and we’ll start with the Header-Text-Box-Left page element which you can see marked with a red square in the image.
Download Now

0 comments
Post a Comment